Whether you’re a face to face personal trainer that sells training by the month, or by the package or block, or you’re an online trainer that bills their clients for a 3-month training block or monthly. However you run your business, you’ll need a way to take payments for your personal training services.
Taking online payments have come a long way in the last few years. There are many services you can use but there is nothing as popular and trusted worldwide as PayPal.
Whether you want to take one-off package payments or offer subscription options to your clients, PayPal can handle it and also offers integrations to your personal trainer website that makes the user experience for your clients super smooth and automated. This will allow you and your clients to focus on the important aspects of their plan: building the rapport, assessing their goals, designing workouts and providing excellent coaching service throughout their journey.
Step 1. Get A PayPal Business Account
Head over to PayPal and click sign up to start creating a business account. If you prefer a step-by-step help in setting up your account, you can either call them or check out their getting started guide.
Please note we included the main US landing page but you can click the little flag in the bottom right to choose your region.
Please note we included the main US landing page but you can click the little flag in the bottom right to choose your region.
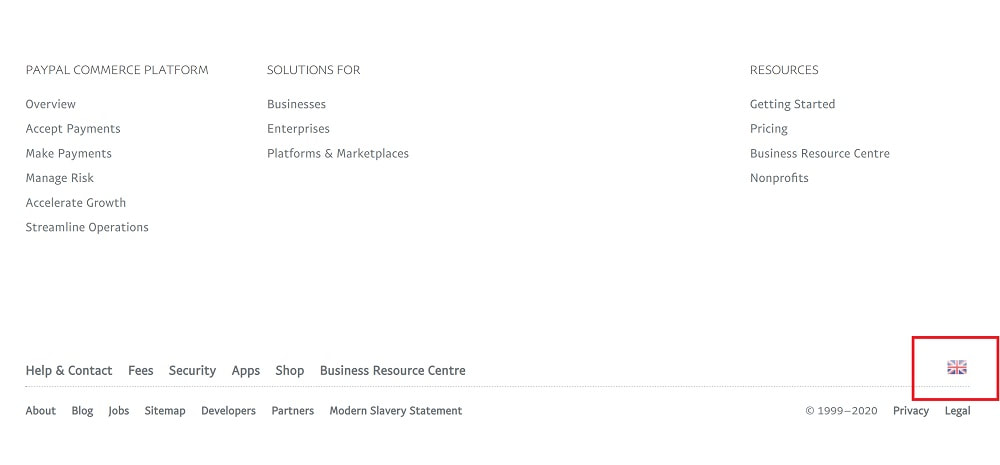
It only matters where you are - not where the payment is coming from so if you take international payments from online personal training clients, don’t worry. You'll even be able to add multiple currencies if you wish to handle payments from different countries and currencies.
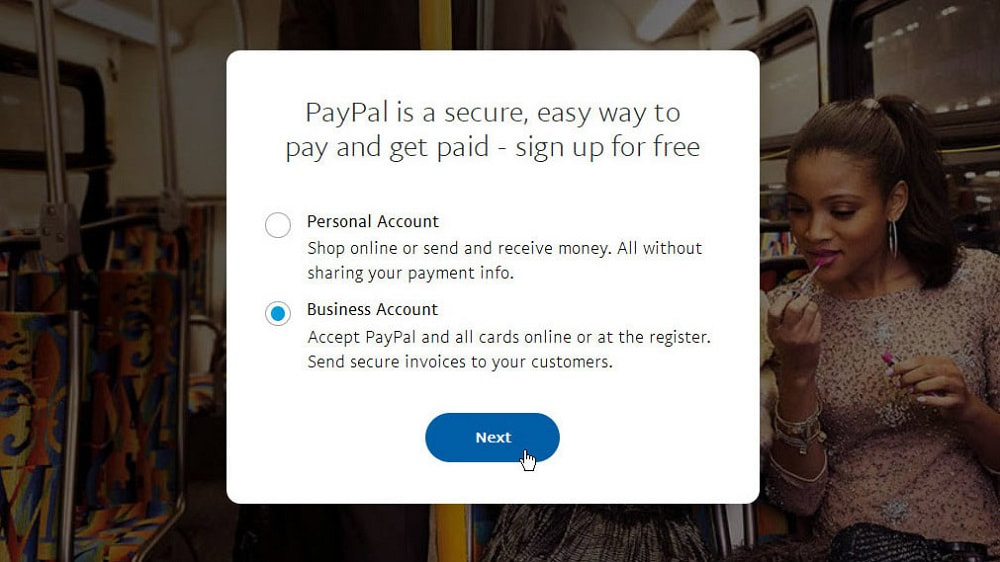
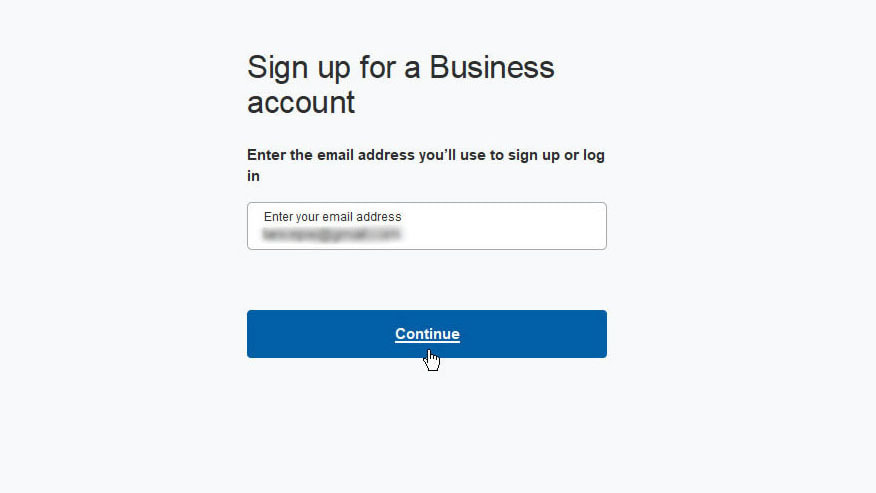
So, after clicking Sign Up, you'll need to select business account when prompted. Click Next.
Add your email address. We highly recommend using your business email as that's where you'll receive all the notifications and verification emails from PayPal. Click Continue.
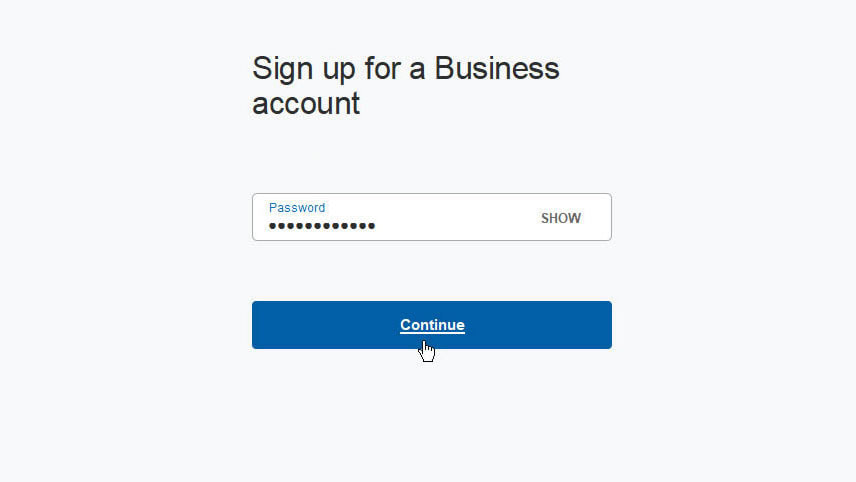
Create your password. Press Continue.
Next, you’ll need to enter your business and contact contact information. Take your time reading through the agreements, and then click Continue.
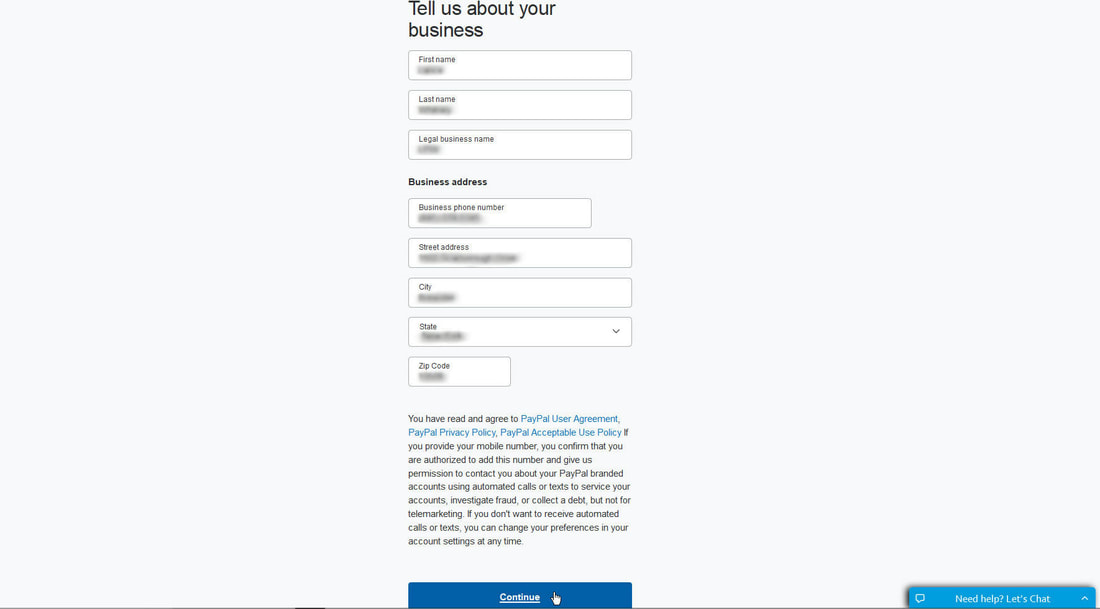
PayPal will want some business information next.
If you’re registered as a limited company or a sole trader you’ll be entering slightly different information so check carefully which one you need to give.
If you’ve got a personal trainer website, you can add the URL then click Continue.
If you’ve not yet built your website, here are some resources to get you started on building your own, or you can chat to us about our done for you service.
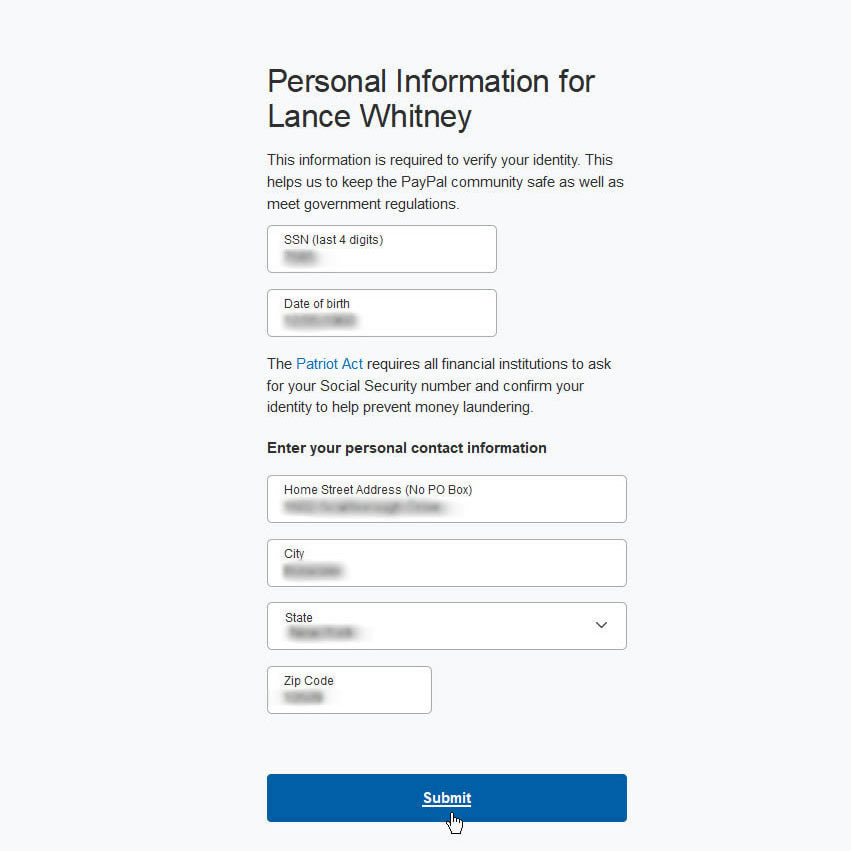
At the next step PayPal will then ask for some personal details to confirm you are who you say you are and send an email to the address you entered earlier in the process. Hit Submit.
You will need to verify your account by clicking on the link they send you in that first email. Once that's complete, your PayPal business account is all set up. If you want to see a video on how to do the above, PayPal has pretty helpful resources.
Before you can withdraw any money from your PayPal account, you will need to set up and link a bank account to your PayPal.
Step 2. Connecting Your Bank Account
The next step will be to connect your PayPal business account to whichever bank account you use for your personal training business. That may mean a special business bank account (especially if you’re a limited company), or a personal banking account.
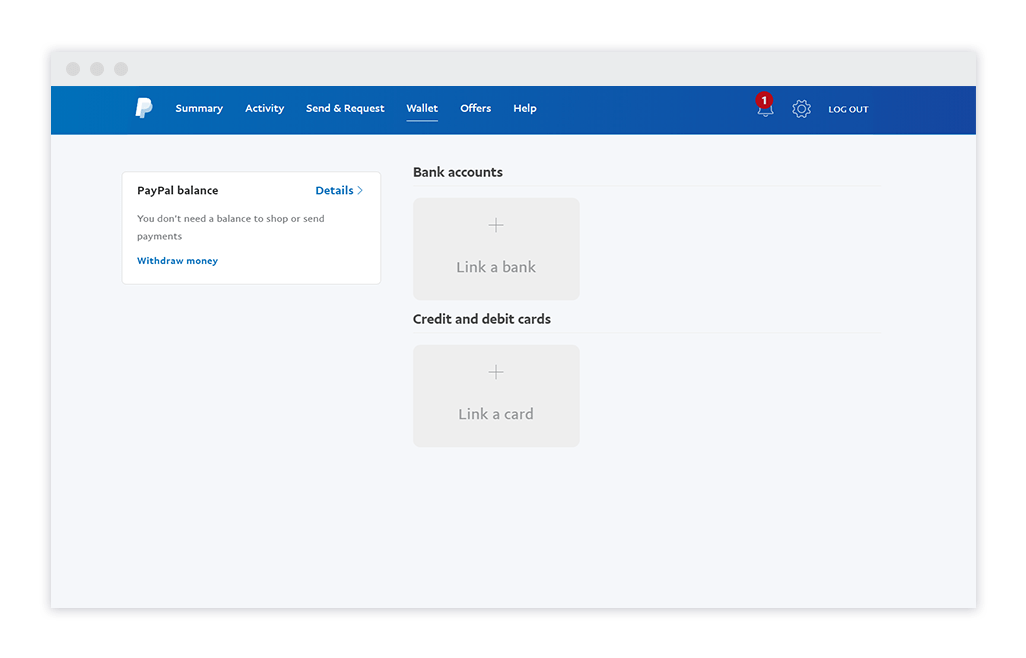
Once you’re logged in to your PayPal business account, click Money on the top of the page.
Click link a new bank, and either select your bank from the list or search for it in the “don’t see your bank?” option.
Once you’re logged in to your PayPal business account, click Money on the top of the page.
Click link a new bank, and either select your bank from the list or search for it in the “don’t see your bank?” option.
Some bank accounts link up instantly, and others need to have the details entered manually. Follow the instructions for your specific circumstances, and click Agree & Link. If the instant option is available to you, your account will be linked immediately.
If you had to enter your details manually, it will take a little longer. In that case, during the next three days, PayPal will make two small payments into your account.
Once you’ve noticed they’ve been paid in, you can finalise your setup by confirming the deposits. Here’s how you do that part:
If you had to enter your details manually, it will take a little longer. In that case, during the next three days, PayPal will make two small payments into your account.
Once you’ve noticed they’ve been paid in, you can finalise your setup by confirming the deposits. Here’s how you do that part:
- Log into the business account, click Money at the top.
- Select the bank account you want to confirm and then click Confirm.
- Enter the exact amounts of the two deposits made. Then click Submit. You’re all done
Step 3. Create The Subscription In PayPal
Setting up a subscription is different from taking a one-off payment with PayPal because you’re asking it to bill a customer regularly.
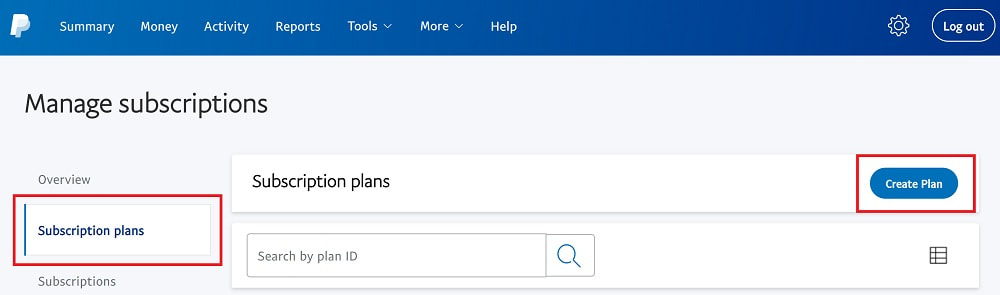
Log in to your PayPal business account and find the Subscriptions menu in the navigation area and click.
From here, you can manage existing subscriptions you have set up, or you can create a completely new subscription.
To add a new subscription, click Subscription Plans on the left then the blue Create Plan button on the top right.
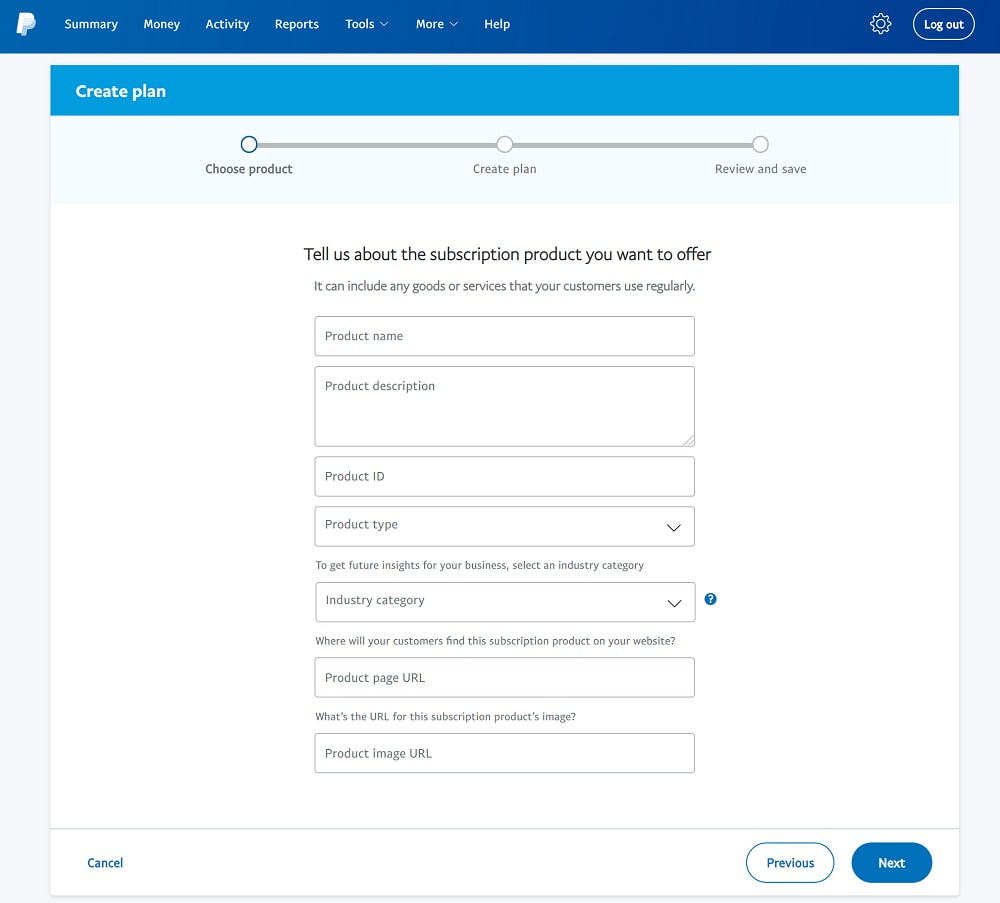
PayPal will ask you to describe the service you’re creating the subscription for:
Once you added all the details click Next.
- Give it a name and description.
- Select the product type: physical goods, digital goods, or service (most of what you’ll be setting up will be services).
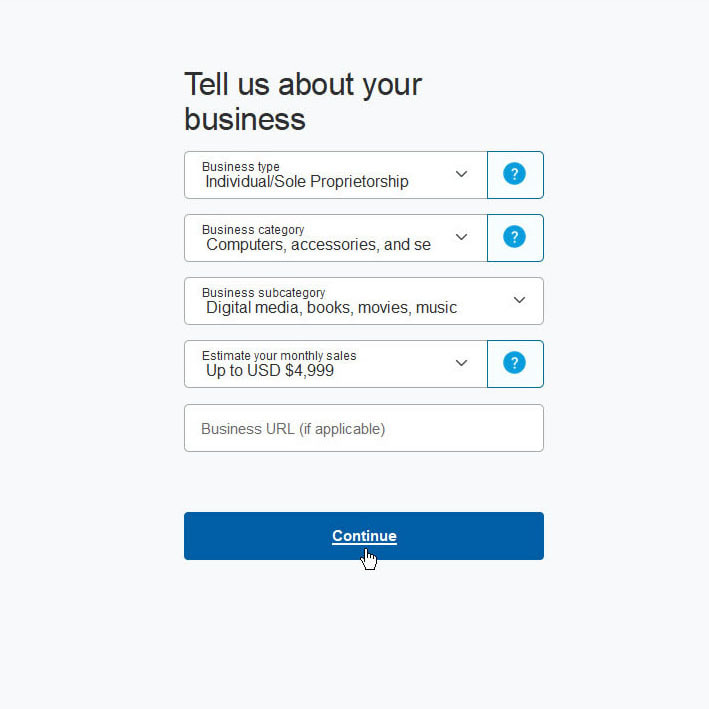
- Choose an industry category that best describes your personal training business.
- Copy and paste the product page URL from your website that describes the service.
- Copy and paste the product image URL if applicable.
Once you added all the details click Next.
Next, PayPal will ask if you want to set up fixed pricing or quantity pricing.
In fixed pricing your client gets charged the same amount each month you set them. For example if you agree that your client pays for 8 sessions per month every month, this will be a good option. It's also the best option for all monthly subscription based online coaching services.
In quantity pricing, the client will decide which package they choose, e.g. you can give them the option to subscribe to 4, 8 or 12 monthly PT sessions and pay for them monthly.
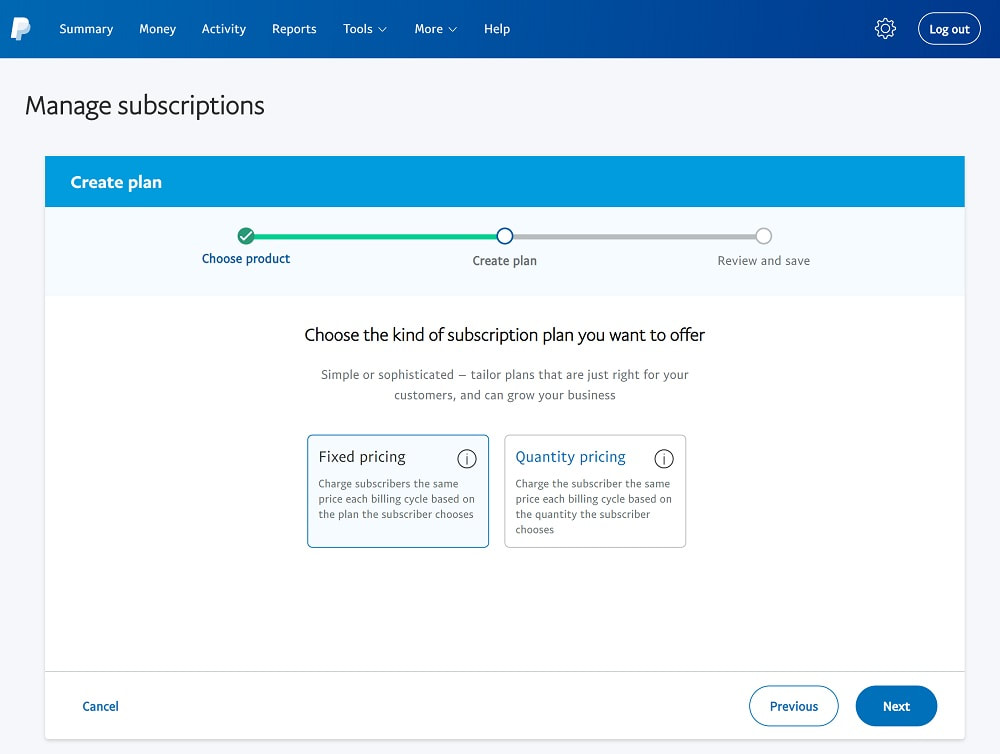
From a user experience point of view it makes sense to stick to fixed pricing and only send clients to the payment after you've agreed what they choose.
Make your selection, and click Next.
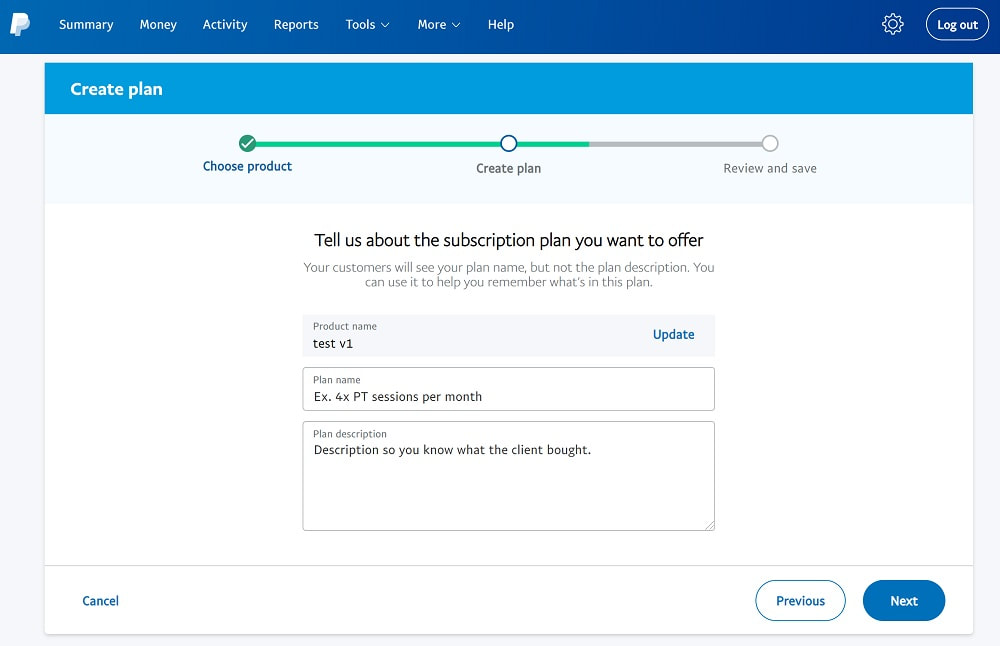
On the next screen you'll need to add the Plan name and Plan description.
Make your selection, and click Next.
On the next screen you'll need to add the Plan name and Plan description.
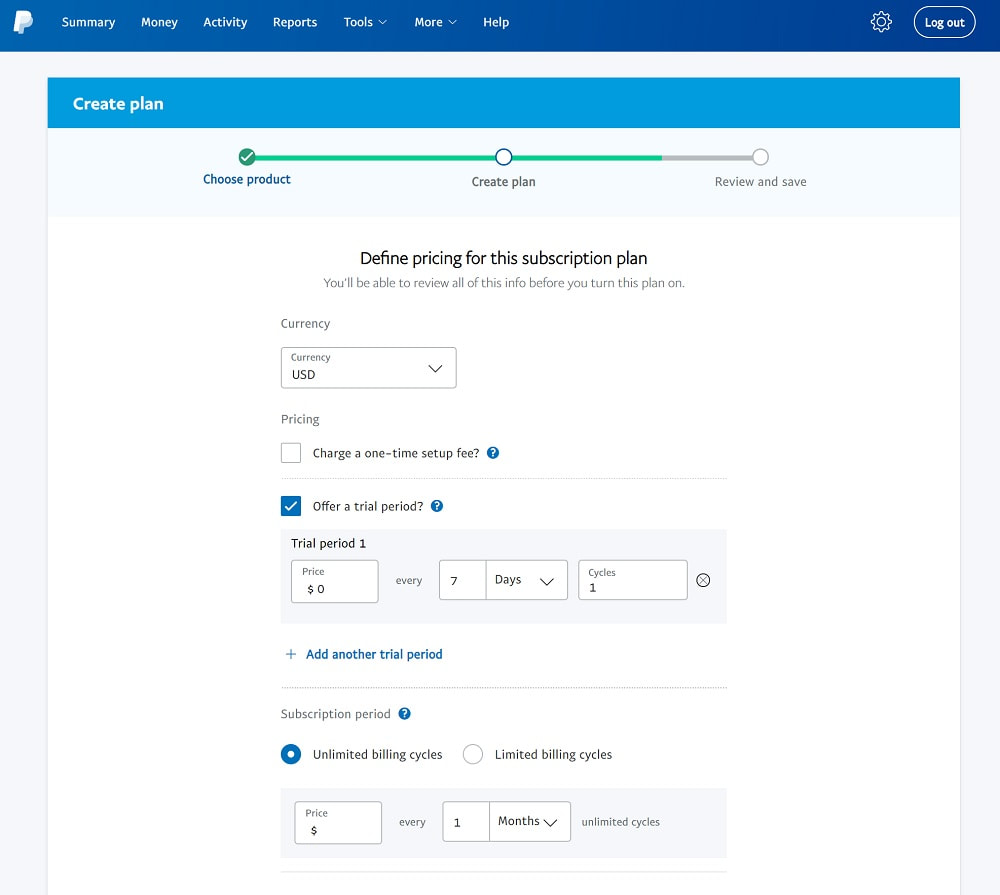
Next, you’ll set up the pricing which involves selecting the currency. Choosing the currency where you live and/or of your bank account is strongly advised.
Enter the price that your clients will pay. Choose whether you will charge a one-time set-up fee or a trial period. You can also choose whether the subscription should be going on for an unlimited time or if there's an end to it. Select how you want to calculate tax for the plan. Enter the tax rate. Click Next.
Enter the price that your clients will pay. Choose whether you will charge a one-time set-up fee or a trial period. You can also choose whether the subscription should be going on for an unlimited time or if there's an end to it. Select how you want to calculate tax for the plan. Enter the tax rate. Click Next.
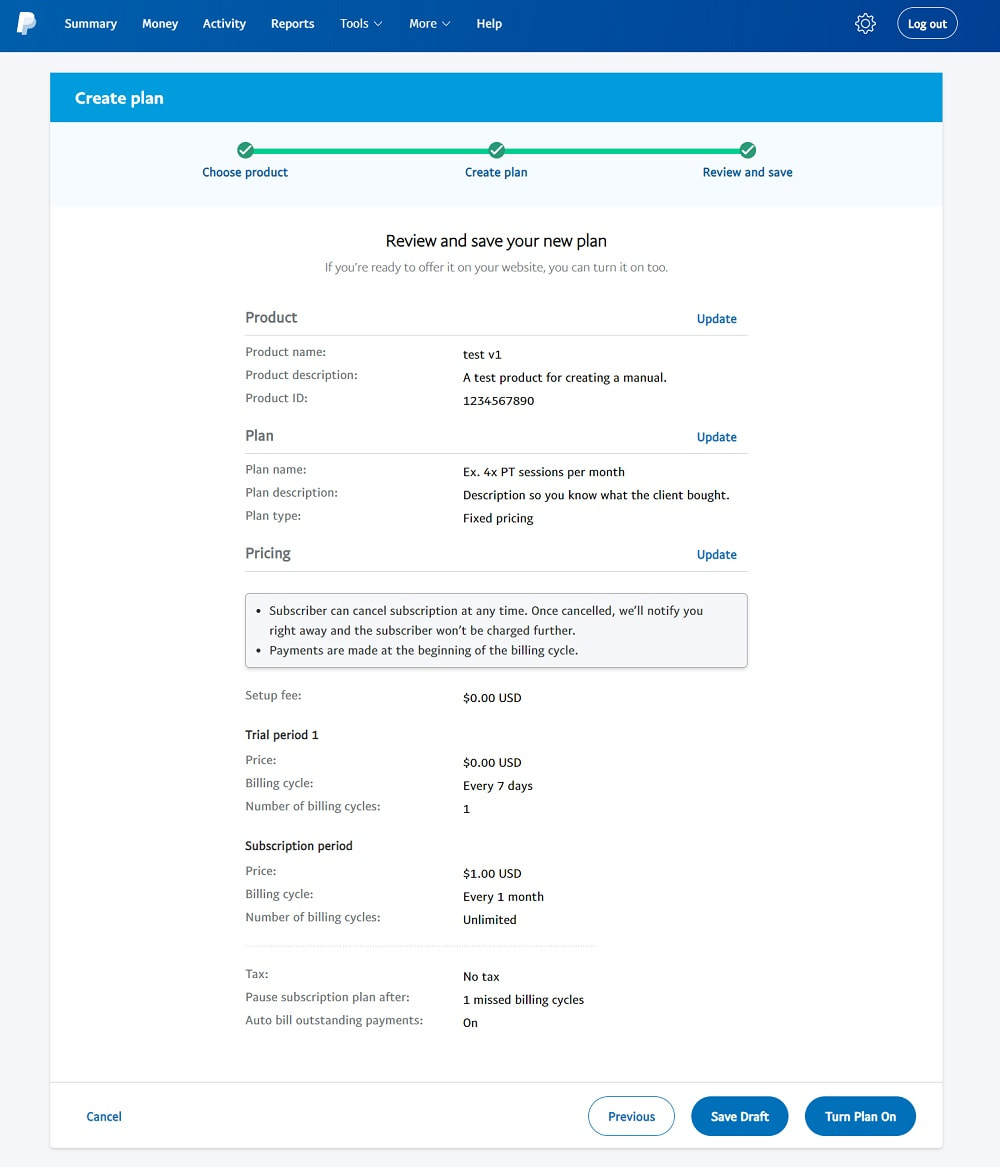
You’re almost done now. PayPal will show you an overview of the subscription you just created. At this step you have three options:
- You can go back and make edits by hitting Previous.
- If you think it's OK but for some reason you want to keep it in the Drafts click Save Draft.
- If the Service is ready for launch, choose Turn Plan On.
Once you’ve turned on your plan, you’re ready to add a subscription payment button to your website.
Step 4. Create a PayPal Button
PayPal seems to be upgrading their system to include a range of payment types which means that the setting up a PayPal button looks a bit more complex process depending on the button type you need.
If you are new to PayPal, and you'd like to set-up a one-off Buy Now or Pay Now payment option for a product that doesn't need recurring automated payments, this will be the process to follow. What kind of services or products would you sell via a Pay Now button?
Anything that requires a one-off payment: paid eBooks, one-off package purchases for a limited time plan, e.g. 12-week plan paid in advance or if you are selling one-off custom workout plans, that will fall under here too. So, let's see.
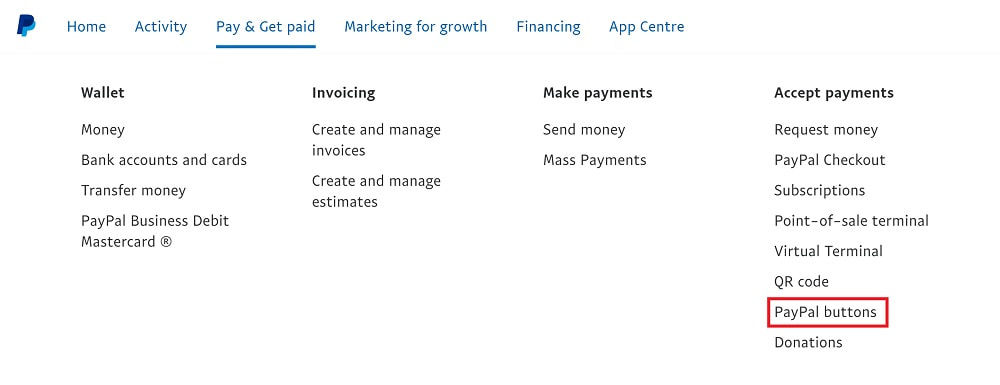
You need to start by finding the PayPal Buttons option on your navigation. This will be under Pay&Get Paid and Accept Payments in the newest version. (If you've been at it for some time, you fill find this under Tools.)
If you are new to PayPal, and you'd like to set-up a one-off Buy Now or Pay Now payment option for a product that doesn't need recurring automated payments, this will be the process to follow. What kind of services or products would you sell via a Pay Now button?
Anything that requires a one-off payment: paid eBooks, one-off package purchases for a limited time plan, e.g. 12-week plan paid in advance or if you are selling one-off custom workout plans, that will fall under here too. So, let's see.
You need to start by finding the PayPal Buttons option on your navigation. This will be under Pay&Get Paid and Accept Payments in the newest version. (If you've been at it for some time, you fill find this under Tools.)
On the next screen you'll be shown all the flashy button options that you may need with a brief description so you can decide the best one for the service or product you want to sell.
The Smart Subscribe will take you to the Subscription set-up discussed in Step 3. above. The Smart Button will take you to the actual button design option where you can decided whether or not you want to allow card payments.
It's great that PayPal offers a range of ways you can get paid, however those buttons have very few design options and if you have a beautifully designed website with your brand all over, those buttons won't always work well depending on your branding.
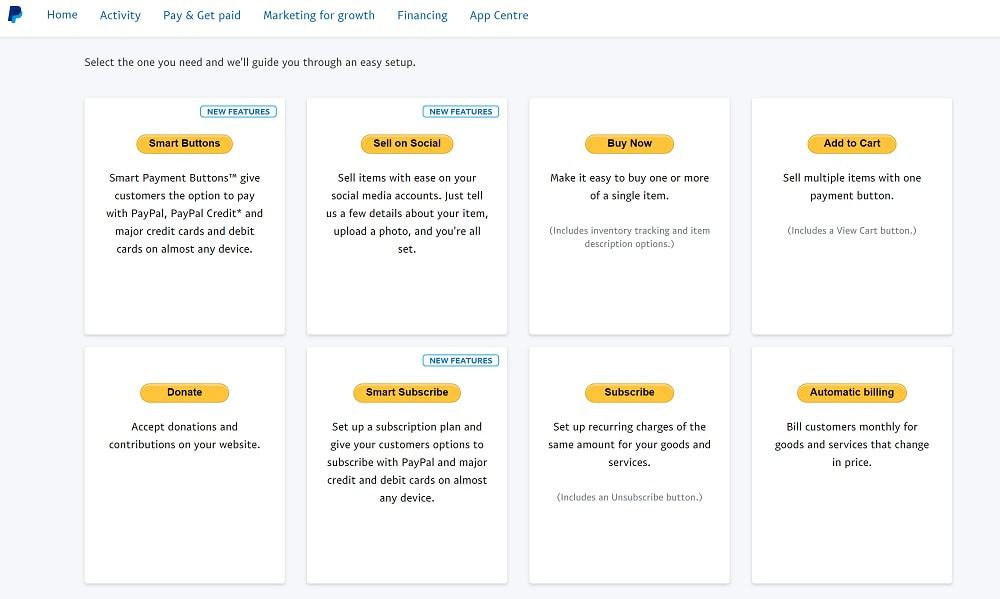
The Buy Now, Add to Cart, Subscribe and Automatic Billing options will all take you to the good old button editor which you can use as universal option if you prefer handling everything the same way.
The Editor will take you through the process in three main steps. The first one is the type of the button and payment details. Out of these option the Subscriptions and the Pay Now options will be most relevant for you as a personal trainer, but it's handy to know you can create a Donation or even set-up an eCommerce profile via PayPal.
The Editor will take you through the process in three main steps. The first one is the type of the button and payment details. Out of these option the Subscriptions and the Pay Now options will be most relevant for you as a personal trainer, but it's handy to know you can create a Donation or even set-up an eCommerce profile via PayPal.
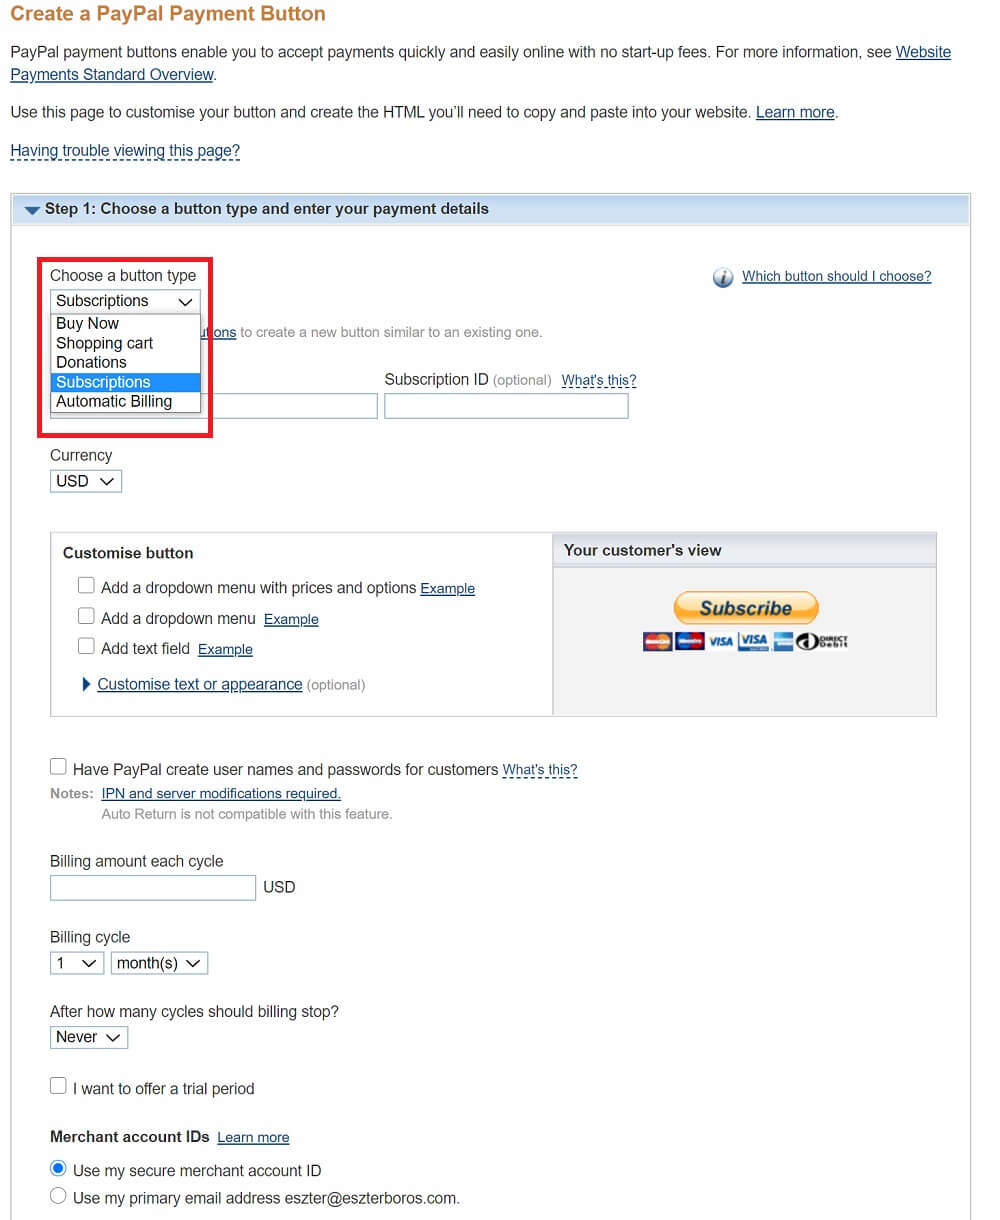
The Subscriptions type will have the same features as the set-up process we've already discussed in Step 3. so we won't go into details on that here.
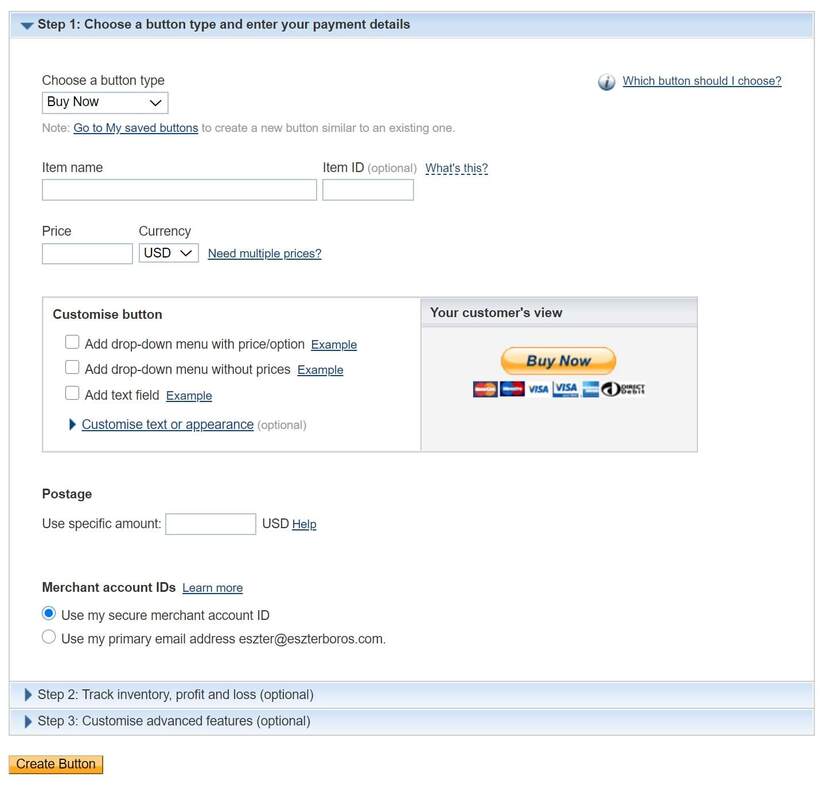
Let's take a look at the Buy Now button type and how to set up its features now. So first you choose Buy Now from the drop-down.
Add Item Name and the Item ID. The latter is optional but if you plan to create stats in the future, they may come handy.
Add the Price and also choose the Currency. Again, we highly recommend using either your own bank card's currency or a universal one like USD if you intend to sell to potential clients across the globe.
Postage price option is for physical goods and you can add a flat fee. Not likely relevant to most of your Services and products though.
Merchant Account IDs - you can have your email address shown or use a secure one PayPal generates you to hide it from spammers. We'd always recommend using the secure option.
Customise Button
If your plan is to use your own fitness website's buttons, this section will not be relevant to you and we'd recommend leaving it as it is.
This might mean you will have to create separate buttons for the different tiers of the same type of service. For ex. if you are selling PT sessions bundles of 4, 8 and 12, you will need to create separate buttons for each rather than having a drop-down menu.
If you plan to embed the payment button with all the features, go ahead and test what works best for you.
Once you added the details, click on the blue line at the bottom that says Step 2. Track inventory, profit and loss (optional).
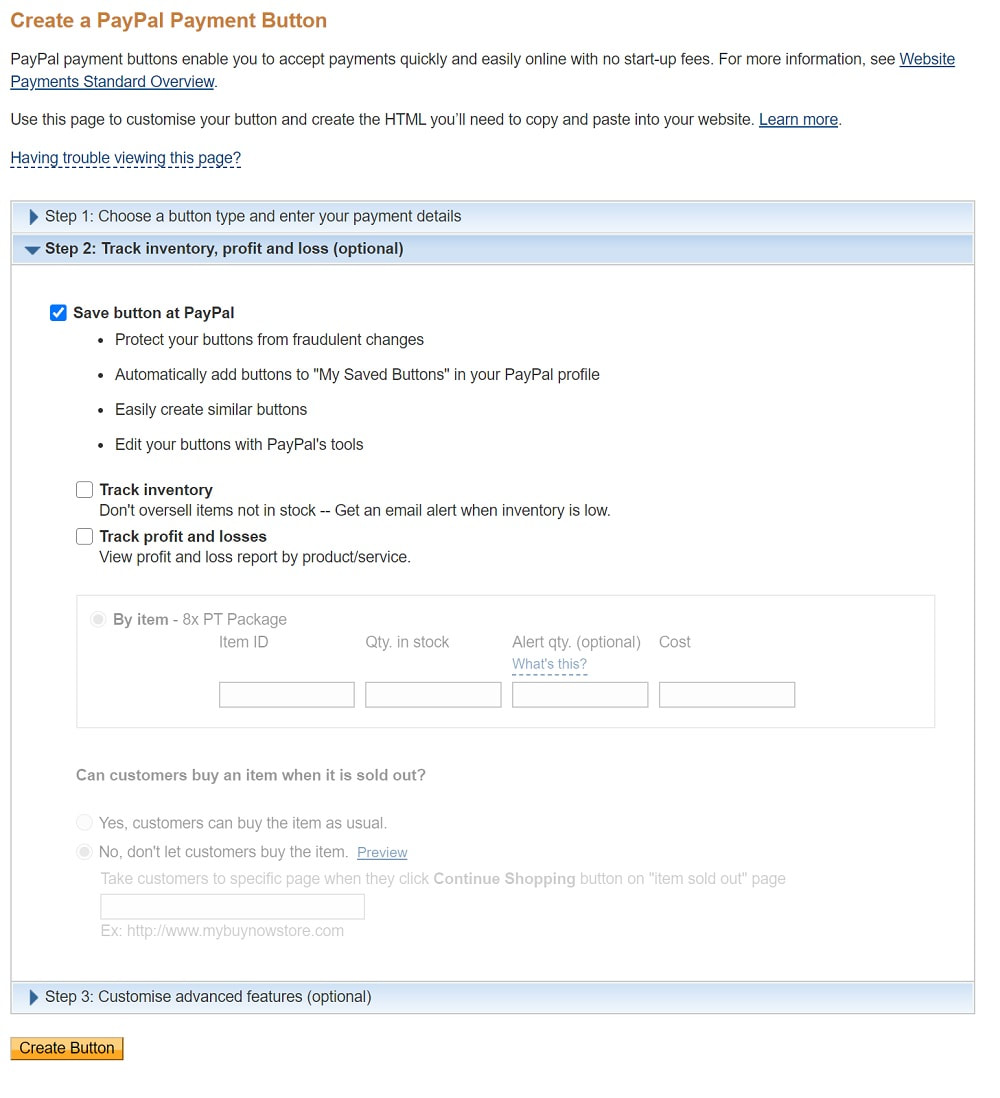
This step is optional and most of its features won't apply to a standard personal training service but it's crucial that you have the 'Save button at PayPal' option ticked so you can find this button at a later time and you can even duplicate it if you're creating multiple tiers of the same type of package.
You can then click on 'Step 3. Customise advanced features' (optional).
You can then click on 'Step 3. Customise advanced features' (optional).
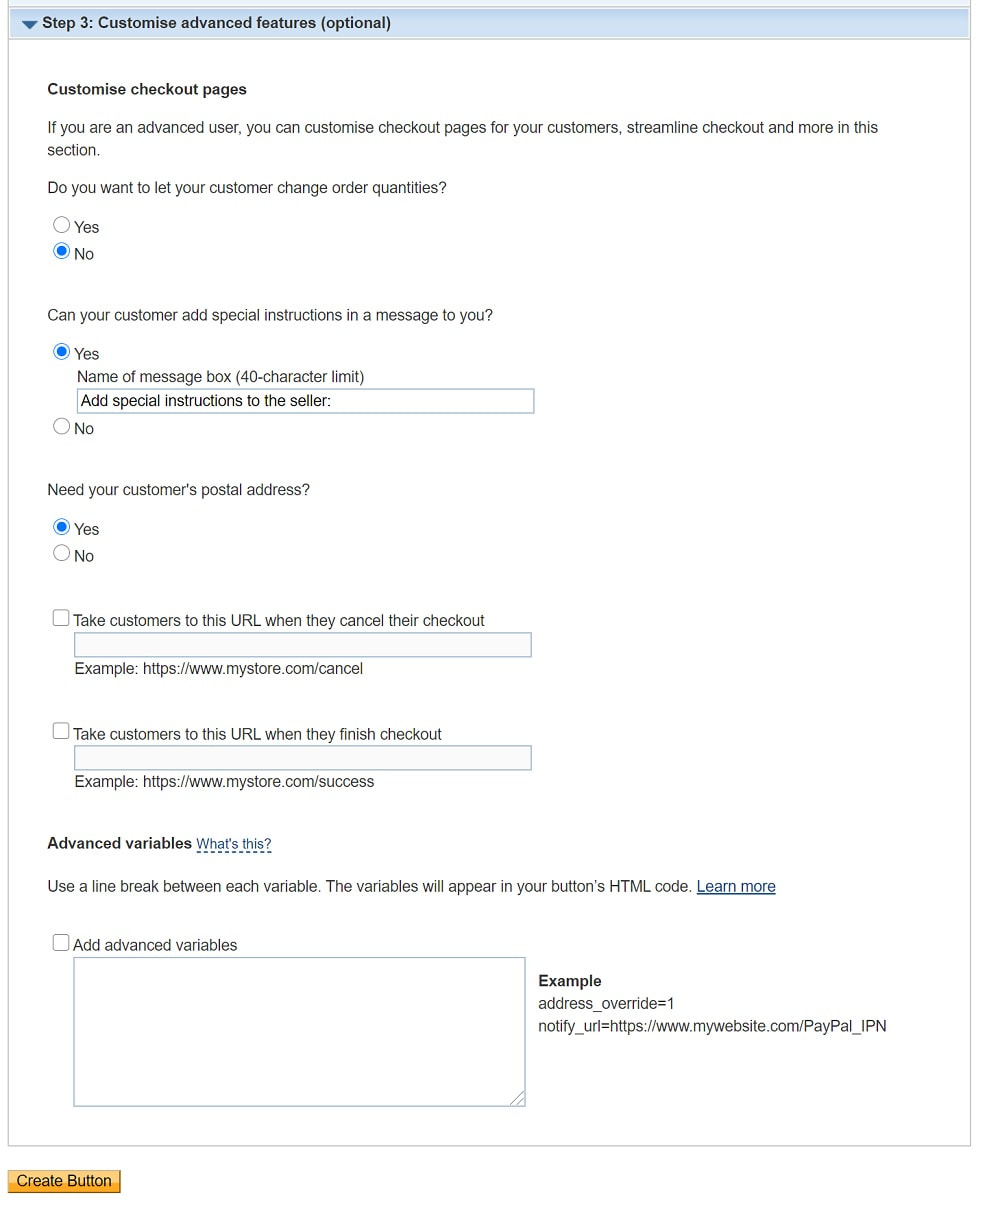
You have got a few features available here, the ones that may be most relevant for you as a personal trainer are:
Once you are happy with the button setting, click the yellow Create Button button at the bottom. You will be taken to the screen where you can grab the embed code or the email link you will need when adding the button to your website. See next step.
- Postal Address - This can come handy if you decide to send your clients thank you cards or other surprise goodies in the future.
- Take customers to this URL when they finish checkout - you can set-up a global redirect after payment, but if you'd like the Thank You page to be tailored to the service your clients purchase, this is where you can add the URL to that specific thank you page. This can also be the Welcome page that tells your clients the Next Steps they need to follow to get started with the programme.
Once you are happy with the button setting, click the yellow Create Button button at the bottom. You will be taken to the screen where you can grab the embed code or the email link you will need when adding the button to your website. See next step.
Step 5. Connect Your Button to Your Website
The next step is to link the PayPal payment button to the relevant service on your website. You can do this on the Services page if you want to give the option to your visitors straight away.
However, if your marketing strategy involves encouraging new website visitors to get in touch first, discuss their goals so you can build rapport and recommend the best suited service for them, you can also create a hidden page with all the subscription options and link the buttons that way.
Since the old button editor doesn't include the subscription options you create in the Subscriptions menu, we'll look at both processes here.
First, Log in to your PayPal Business account
Subscriptions
You can access the options you created only here under Subscriptions and the Subscription plan tab on the left-hand side of the dashboard.
Find the plan you want to make a button for, and click on the three vertical dots on the right of it.
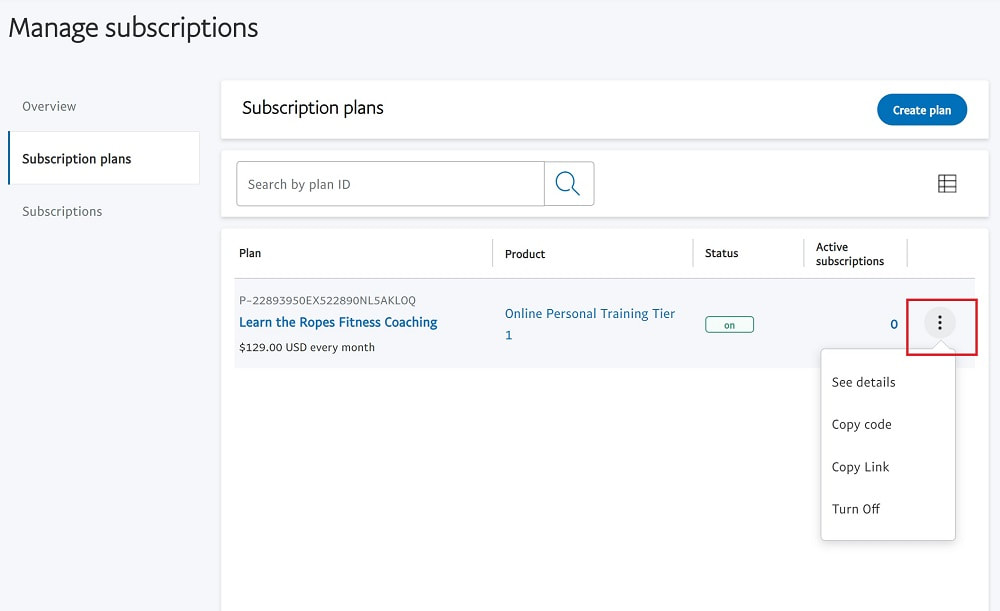
You will then have two options:
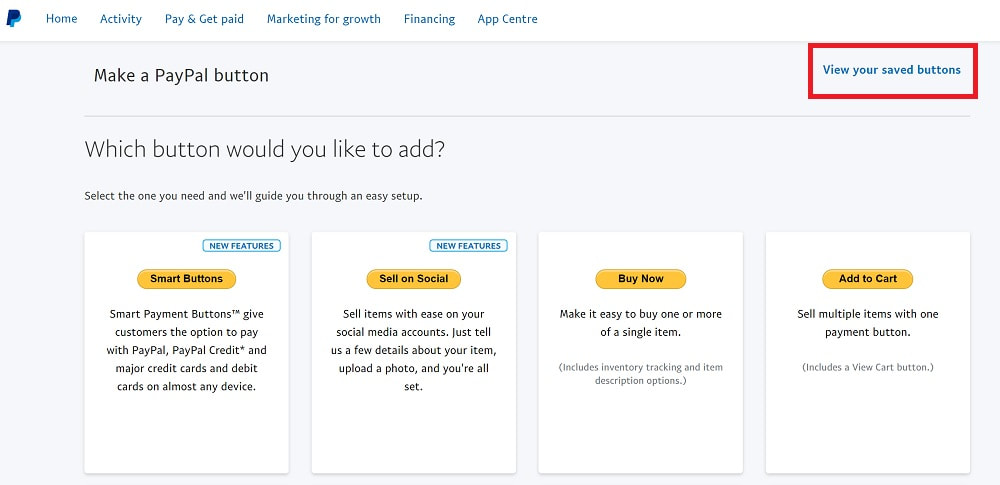
Buy Now Buttons
On you main navigation find the Paypal buttons menu. You'll see all the button options again, but you will be looking for the 'View your saved buttons' link on the top right of the screen.
- Copy code - use this one if you'd like a PayPal branded website button on your website
- Copy Link - use this one if you have a website button you'd like to link up with the payment.
Buy Now Buttons
On you main navigation find the Paypal buttons menu. You'll see all the button options again, but you will be looking for the 'View your saved buttons' link on the top right of the screen.
You will be taken to the old button editor, where you can choose the button you'd like to use and click on Action / View code.

The next screen will be the exact same you land on after pressing the 'Create button' as detailed in Step 4. Again, you will have two options here:
- Website code - this will give you the embed code to add to your website and use PayPal's yellow button
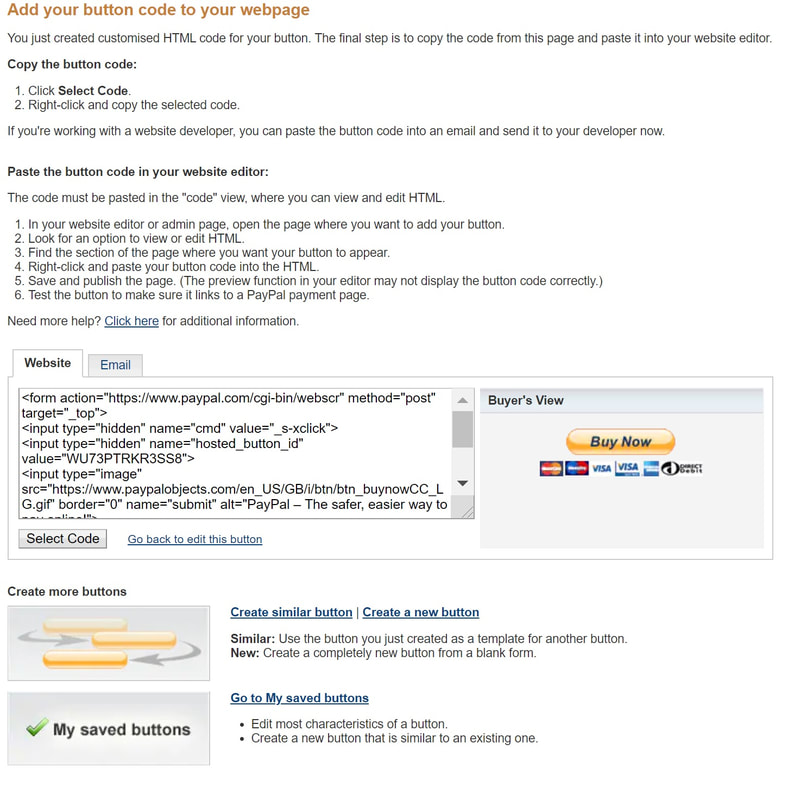
- Email link - if you'd like to add the payment option to the branded buttons of your website, you will need to click the Email link tab and copy the URL shown there.
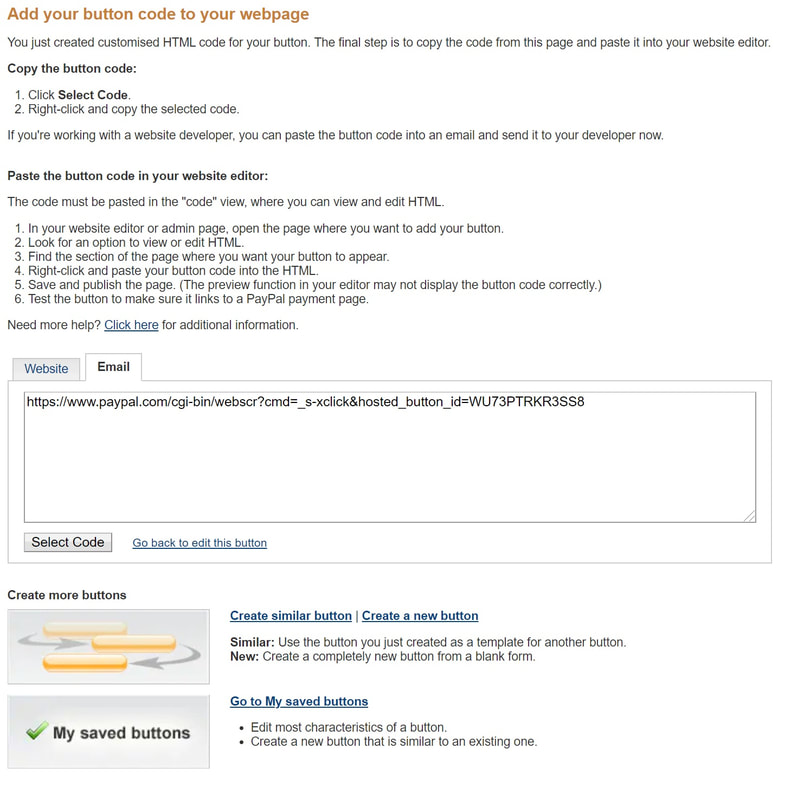
Grab the codes or the links to every service tier you'd like to connect to your website.
If your personal trainer website is managed by a web developer, send them all the codes or links with the instructions so they know which one goes to which service.
If you are managing your website yourself, add the code or link to your services page where you want the buttons to be.
Finally, it's a wise move to test that your payment buttons work properly. You can purchase something from your website, and then check your PayPal Business account for the transaction.
Step 6. Setup The Redirect After Payment
This is optional, but a nice touch. After your client has purchased a service and set up their payment plan using your button, you can redirect them to another link. It can be a good idea to link to:
We already discussed in Step 4. how you can assign individual welcome/thank you pages to your PayPal Buttons. Here you will see the steps to setting up the universal Thank You page for all your website payments.
- A thank you video (which you can pre-record and upload to YouTube)
- A thank you gift (such as a recipe book or a free guide)
- The next steps in their onboarding (such as a questionnaire on their goals, a link to your Facebook group, or social media links they might want to follow)
- Ask if they’d like to bring a friend on board
- sell them something else while they’re primed to buy from you (such as a product they’ll need to be successful in their time with you, like a scale)
We already discussed in Step 4. how you can assign individual welcome/thank you pages to your PayPal Buttons. Here you will see the steps to setting up the universal Thank You page for all your website payments.
- Log in to your PayPal Business account.
- Hover over your profile in the top right corner of the page.
- Click Account Settings.
- On the left-side bar scroll down to Products & Services and click Website Payments.
- Click the Update link next to Website Preferences option.
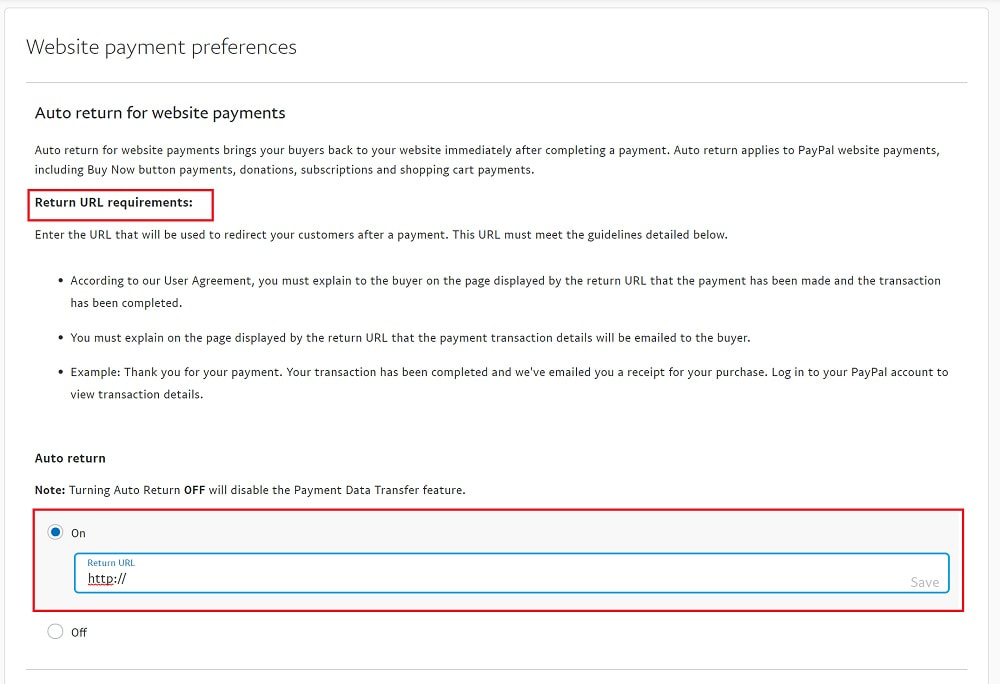
- Click the Auto Return On button. Review the Return URL Requirements. Enter the Return URL (the designated page on your website where you want to send your clients after they’ve paid).
- Click Save - becomes visible at the far right of the field you need to fill once you start typing.
This step is a little extra work but it’s your first opportunity to go over and above for that new client and make a great first impression.